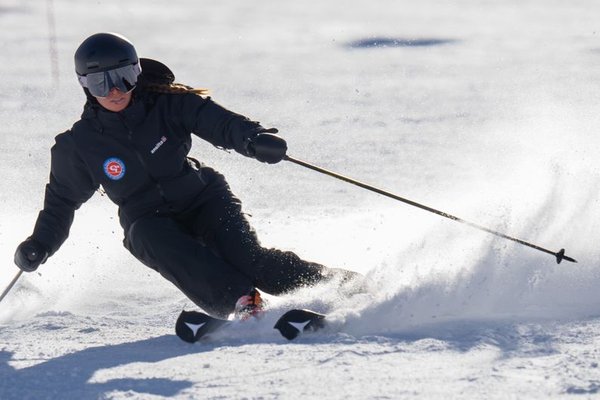
Moving from wedge turns to parallel skiing can feel like a big jump. With a wedge, pointing your ski tips toward each other helps control speed. Parallel turns ask you to steer both skis in the same direction instead. The key to parallel skiing technique isn’t squeezing your skis together: it’s finding balance, releasing the old edges and guiding your legs through smooth arcs.
If you can already link wedge turns, choose a wide, gently groomed slope where stopping feels easy. The goal is to build confidence gradually, not to abandon control in pursuit of perfect-looking tracks.
What Makes a Turn Parallel?
In a wedge, the ski tips are closer together than the tails. In a parallel turn, the skis point in nearly the same direction and stay roughly hip-width apart. They do not need to touch. As the turn develops, both skis generally engage corresponding edges rather than the opposing edges of a wedge.
Early parallel turns skiing often involves some sideways slipping, or skidding. That’s useful for speed control and doesn’t mean the technique is wrong. Precise carving comes later. For now, concentrate on finishing every turn balanced enough to start the next one.
Learn the Parallel Skiing Technique Step by Step
1. Start in a Balanced Stance
Keep your feet about hip-width apart, ankles and knees gently bent, and shins resting against the fronts of your boots. Hold your hands in view ahead of you. Look toward where you want to travel, with your weight centered over your feet rather than back on your heels. This athletic position supports skiing balance when the terrain changes.
2. Reduce Your Wedge Gradually
Make several comfortable wedge turns, bringing the ski tails a little closer together each time. Because a smaller wedge provides less braking, use rounder turns to manage speed. Finish each arc across the hill instead of rushing straight toward the bottom.
Near the end of a turn, gently lighten and steer the inside ski until it matches the outside ski. The inside ski is nearer the center of the curve. Matching it after the turn begins is a useful bridge between wedge and parallel movement.
3. Release the Edges Before Turning
Your skis cannot turn freely while their old edges are firmly gripping the snow. To begin the next turn, roll your feet and lower legs so the skis briefly flatten. That edge release allows their tips to move toward the new direction.
To feel the difference, practice a short sideslip on easy terrain with an instructor: stand across the slope, slightly flatten your skis to slide sideways, then roll them back onto their uphill edges to stop. Small ankle and leg movements make a surprising difference.
4. Steer Both Legs Through the Arc
Once the edges release, guide both legs toward the new turn while keeping your upper body relatively quiet. Don’t swing your shoulders to drag the skis around. Let the ski tips travel through a smooth curve instead of twisting suddenly downhill. Some skidding is perfectly normal in this stage of ski turn technique.
5. Feel Pressure on the Outside Ski
As the turn develops, pressure builds mostly on the outside ski: your right ski in a left turn and your left ski in a right turn. Balance over that leg while the inside leg stays relaxed, flexed and involved. Avoid leaning so far into the turn that your outside ski loses support.
You also don’t need to lift your inside ski. Let both skis glide on the snow and allow the inside ski to follow the same arc.
6. Finish and Link the Next Turn
Continue steering until your skis point farther across the slope and your speed settles. Release their edges again and begin an arc in the opposite direction. Linked, rounded S-shaped turns feel more controlled than abrupt Z-shaped changes. Over time, work toward matching the skis earlier in each turn.
Practice Drills That Make the Movements Click
The Inside-Ski Tap
Make a small wedge turn on gentle snow. Near the finish, lightly tap the inside ski’s tail on the surface, then steer it into alignment with the outside ski. The tap encourages you to lighten the inside ski without throwing your upper body around.
One Big C at a Time
Start facing across an easy slope and make one large, rounded turn until you’re traveling across it in the other direction. Stop and reset. Repeat on both sides before linking turns. This isolates the release, steering and finish without adding pressure to maintain a rhythm.
Four Even S-Turns
On an uncrowded beginner run, link four turns of roughly equal size. Use a calm rhythm: release, steer, finish. If you gain speed, make the turns rounder rather than forcing a sudden skid. The aim is predictable control, not quickness.
Fix These Common Problems
If the inside ski stays in a wedge, you may be gripping its old edge or putting too much weight on it. Lighten that leg, flatten its ski and steer it to match. Simply pulling your feet together doesn’t solve the underlying issue.
If the skis cross, allow more space between your feet. Parallel doesn’t mean touching. If your shoulders swing with every turn, keep looking along your intended route and let your legs do most of the steering. If speed becomes frightening, return to easier terrain and finish each turn farther across the slope.
Know When You’re Ready for More
Move to steeper runs only when you can link turns, manage speed and stop reliably on easy slopes. Crowds, icy patches and fatigue all change the challenge. Qualified instruction helps correct habits you may not notice yourself and can make beginner skiing skills safer to practice.
Good next topics to explore include ski trail difficulty ratings, ski boot fit and additional beginner balance drills. Properly fitted equipment matters because small movements are harder to judge when your feet shift inside your boots.
Frequently Asked Questions
How long does it take to learn parallel skiing?
There is no set number of days. Some beginners match their skis after a few sessions, while others need more practice with balance, turning and speed control. Regular lessons and suitable terrain support steady progress.
Should parallel skis be close together?
Not especially. A comfortable stance around hip width gives your legs room to turn and tip independently. Matching their direction is more important than making the gap tiny.
Are parallel turns the same as carving?
No. Basic parallel turns can include controlled skidding. Carving uses engaged edges to guide the skis along cleaner arcs with much less sideways slip. You do not need to carve to ski parallel.
Are ski poles necessary for learning?
No. Pole plants may improve timing later, but the core skills are edge release, leg steering and balance. An instructor can help decide when poles are useful in your progression.
Make Smoothness Your Measure of Progress
Forget the idea that success means keeping your skis perfectly close together. A confident parallel skier releases the edges, steers both legs, balances over the outside ski and finishes each arc without rushing. Practice those movements separately, then link them into a comfortable rhythm. Control comes first; elegance follows.